
 Register
Share your Photoshop tips!
TANTIVE XI :: TANTIVE INVENTIVE - Creative with Star Wars :: Tantive Inventive :: Pictures and Image Tips
Page 1 of 1 • Share

Share your Photoshop tips!
![]() by psybertech Wed May 06, 2015 10:55 pm
by psybertech Wed May 06, 2015 10:55 pm
If you have any useful Photoshop (or other image manipulating program) tips, share them here.
_________________
"That's no moon, it's Alex's arse!"
psybertech- Sullust Samurai
- Posts : 756
Join date : 2015-02-23
Yavin Honor : 1875
Age : 51
Location : Jersey Texan :)
Focus : Leia Bespin -

Re: Share your Photoshop tips!
![]() by chris.75 Mon Jan 11, 2016 3:01 pm
by chris.75 Mon Jan 11, 2016 3:01 pm
A way of loading the pics into PS, using windows OS, is just to select all the pics, then open PS and drag them across into it. PS uses a lot of memory to process the image adjustments, however, so If your pics are of a large size, I suggest only loading four or five at a time. Otherwise if you have an older setup, like me, then it may struggle a little and slow down. That is where Apple Macs are far superior, when creating image manipulation, and is the preferred choice of any graphic designer, or architect 
I find it best to re size your image first, so that it is ready for upload, before making any visual adjustments, as they tend to look different again, once made smaller. Particularly when using the "sharpen" effect tool. Doing this first will also result in faster performance from the PS software and your PC.
My original pics are roughly around 130cm X 180cm which are obviously too big for uploading, so to re size them, I click the "Image" tab at the top of the screen.
Then scroll down to "Image Size", then in the drop down tab that shows the size in "Centimetres", I then choose "percent".
Then in the dimensions box I click 30, this reduces my pic to 30% of its original file size, resulting in an image around 50cm X 80cm, which is far easier to work with and upload (but still a bit big really for uploading, as it can result in slow loading screens on the forum).
The image will then appear quite small on the screen, so then simply click "View" then click "Fit On Screen". The image will then be at a more workable size.
Once re sized I then crop the pic using the square marquee selection tool, found on the side toolbar (second icon down from the top). once I have selected the marquee selection tool, I then look to the top toolbar and see the "feather" box. I make sure this is set to 1px, which gives a nice natural looking edge to the cropped image. Next is the "Style" tab, found just to the right of the "feather" tab.
Where it says "Style" I click on "fixed Aspect Ratio" in the drop down tab. Then in the "width" and "Height" boxes, I set the aspect ratio to 200 X 200 for coo shots, and "200 X 375 for figure shots. To select the area for cropping, simply click and drag the cursor over the pic. This creates a box shape with a dotted outline. You can move the box into place, by hovering the mouse over a corner, it then turns into a small white triangle, enabling you to move the box around, until you have the best composition.
When you are ready to crop, on your keyboard, hold down the shift button and the letter "C" at the same time, this then automatically changes the tool to the "crop" tool. Then crop the image by pressing the "Return/Enter" button on your keyboard. The image is now cropped to the desired aspect ratio.
Then I do things slightly differently from Clint, in that I do not use the "auto contrast" or the "Curves" tool.
Instead I click "Image" then "Adjustments" then "Levels". Once the "Levels" tool window has opened, I then click "Auto", which automatically adjust all the brightness and contrast levels to the most optimum settings.
This works around 80% of the time, but sometimes it gets it slightly wrong, so then I just manually move the sliders in the "Levels" tool.
The left slider controls the shadows, the middle slider controls the mid tones, and the right slider controls the highlights. I then just tweak these levels until the pic is looking its best.
Next I click on the "filter" tab at the top of the screen, then click "sharpen", followed by "Unsharp Mask". This then brings up the "sharpen" tool box, in it you will find three sliders, "Amount", "Radius" and "Threshold".
Now getting the best results from these settings will vary, depending on the size of your image, the original sharpness of your image (whether it is in clear focus, or slightly blurred) and also whether you are using this tool for figure shots or coo shots.
With figure shots I tend to have it set up with the following settings:
"Amount" - 150, "Radius" - 1.5, and "Threshold" - 4. This results in a nice crisp image.
If it is a coo shot, then it can vary a bit more from shot to shot, but I tend to go with these settings:
"Amount -200, "Radius" - 3.5, "threshold" - 4.
Sometimes this can result in too much digital noise, where the pic looks covered in tiny spots. So its always best to just have a bit of a play around with the sliders, with the preview function on, so you can see the results, before applying them.
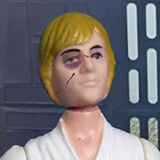
Finally I tweak the colour saturation, if needed, by clicking "Image", "adjustments", "Hue Saturation", then adjust the saturation slider until I am Happy with the result. Then I just removed any unwanted marks or scratches with the "Clone" tool, as well as any needed paint touch ups.
I also tend to save the altered image under a different name than the original file, so that I still have the original, just in case.
I find it best to re size your image first, so that it is ready for upload, before making any visual adjustments, as they tend to look different again, once made smaller. Particularly when using the "sharpen" effect tool. Doing this first will also result in faster performance from the PS software and your PC.
My original pics are roughly around 130cm X 180cm which are obviously too big for uploading, so to re size them, I click the "Image" tab at the top of the screen.
Then scroll down to "Image Size", then in the drop down tab that shows the size in "Centimetres", I then choose "percent".
Then in the dimensions box I click 30, this reduces my pic to 30% of its original file size, resulting in an image around 50cm X 80cm, which is far easier to work with and upload (but still a bit big really for uploading, as it can result in slow loading screens on the forum).
The image will then appear quite small on the screen, so then simply click "View" then click "Fit On Screen". The image will then be at a more workable size.
[900][You must be registered and logged in to see this image.][/900]
Once re sized I then crop the pic using the square marquee selection tool, found on the side toolbar (second icon down from the top). once I have selected the marquee selection tool, I then look to the top toolbar and see the "feather" box. I make sure this is set to 1px, which gives a nice natural looking edge to the cropped image. Next is the "Style" tab, found just to the right of the "feather" tab.
Where it says "Style" I click on "fixed Aspect Ratio" in the drop down tab. Then in the "width" and "Height" boxes, I set the aspect ratio to 200 X 200 for coo shots, and "200 X 375 for figure shots. To select the area for cropping, simply click and drag the cursor over the pic. This creates a box shape with a dotted outline. You can move the box into place, by hovering the mouse over a corner, it then turns into a small white triangle, enabling you to move the box around, until you have the best composition.
[900][You must be registered and logged in to see this image.][/900]
When you are ready to crop, on your keyboard, hold down the shift button and the letter "C" at the same time, this then automatically changes the tool to the "crop" tool. Then crop the image by pressing the "Return/Enter" button on your keyboard. The image is now cropped to the desired aspect ratio.
[900][You must be registered and logged in to see this image.][/900]
Then I do things slightly differently from Clint, in that I do not use the "auto contrast" or the "Curves" tool.
Instead I click "Image" then "Adjustments" then "Levels". Once the "Levels" tool window has opened, I then click "Auto", which automatically adjust all the brightness and contrast levels to the most optimum settings.
This works around 80% of the time, but sometimes it gets it slightly wrong, so then I just manually move the sliders in the "Levels" tool.
The left slider controls the shadows, the middle slider controls the mid tones, and the right slider controls the highlights. I then just tweak these levels until the pic is looking its best.
[900][You must be registered and logged in to see this image.][/900]
Next I click on the "filter" tab at the top of the screen, then click "sharpen", followed by "Unsharp Mask". This then brings up the "sharpen" tool box, in it you will find three sliders, "Amount", "Radius" and "Threshold".
Now getting the best results from these settings will vary, depending on the size of your image, the original sharpness of your image (whether it is in clear focus, or slightly blurred) and also whether you are using this tool for figure shots or coo shots.
With figure shots I tend to have it set up with the following settings:
"Amount" - 150, "Radius" - 1.5, and "Threshold" - 4. This results in a nice crisp image.
[900][You must be registered and logged in to see this image.][/900]
If it is a coo shot, then it can vary a bit more from shot to shot, but I tend to go with these settings:
"Amount -200, "Radius" - 3.5, "threshold" - 4.
Sometimes this can result in too much digital noise, where the pic looks covered in tiny spots. So its always best to just have a bit of a play around with the sliders, with the preview function on, so you can see the results, before applying them.
Finally I tweak the colour saturation, if needed, by clicking "Image", "adjustments", "Hue Saturation", then adjust the saturation slider until I am Happy with the result. Then I just removed any unwanted marks or scratches with the "Clone" tool, as well as any needed paint touch ups.
[900][You must be registered and logged in to see this image.][/900]
I also tend to save the altered image under a different name than the original file, so that I still have the original, just in case.

chris.75- Tatooine Taisho
- Posts : 3310
Join date : 2015-02-19
Yavin Honor : 9996
Age : 48
Location : U.K
Focus : Darth Vader, as well as Kenner, PBP, Poch, LL, GL and other lines, basically everything vintage sw I can get my hands on!!
Re: Share your Photoshop tips!
![]() by Commander Clint Mon Jan 11, 2016 3:18 pm
by Commander Clint Mon Jan 11, 2016 3:18 pm
Thought that I would share with everyone how I've been editing the pictures in Photoshop. I use a Mac, so things look slightly different, but the commands are basically the same.
First open the picture you would like to edit. You can actually open all the pictures you would like to edit at the same time. Just highlight them on your computer and then "right click" - "open with Adobe Photoshop CS2".
You have to do the following steps with each picture.
First thing I do is, Image - Adjustment - Auto Contrast. You don't have to do anything else, this is done automatically for you.
[You must be registered and logged in to see this image.]
Next is, Image - Adjustment - Curves. You put your curser in the middle of the box at 128/128, click / hold and drag the dot straight up untill the "Output" level is between 140 & 148. Try to leave the imput level at 128. This will lighten the image. You be the judge on what looks good.
[You must be registered and logged in to see this image.]
Next is, Filter - Sharpen - Sharpen. You don't have to do anything else, this is done automatically for you.
[You must be registered and logged in to see this image.]
Next step is to crop the image. COO's 200x200 & Library card figures are 200x375, ewoks have generally been 200x300 or 200x325. You just have to make sure that you crop all the pictures for the same figure at the same ratio.
[You must be registered and logged in to see this image.]
Last step is to simply File - Save. Sometimes there is a JPG Options box that pops up, just hit OK.
[You must be registered and logged in to see this image.]
Done. Now that wasn't scary at all.
Commander Clint- Jedi Shogun Spirit
- Posts : 10528
Join date : 2015-02-23
Yavin Honor : 26785
Age : 54
Location : Cambridge, Ontario, Canada
Focus : Canadian Items & cardbacks, loose variants

Nico- Tatooine Taisho
- Posts : 3559
Join date : 2015-11-27
Yavin Honor : 10144
Location : Wirral(UK)
Focus : Loose variants (Lando)
Re: Share your Photoshop tips!
![]() by Commander Clint Sun Aug 18, 2019 2:27 pm
by Commander Clint Sun Aug 18, 2019 2:27 pm
Well done Andy. That looks fantastic. 
Commander Clint- Jedi Shogun Spirit
- Posts : 10528
Join date : 2015-02-23
Yavin Honor : 26785
Age : 54
Location : Cambridge, Ontario, Canada
Focus : Canadian Items & cardbacks, loose variants
» Share your photo taking setup!
» SHARE YOUR CHILDHOOD VINTAGE STAR WARS PHOTOS HERE!
» Safe Cleaning Tips
» Generic tips for taking great images
» HOW TO GUIDES - Tips & Tricks to Customize Your Own Figures
» SHARE YOUR CHILDHOOD VINTAGE STAR WARS PHOTOS HERE!
» Safe Cleaning Tips
» Generic tips for taking great images
» HOW TO GUIDES - Tips & Tricks to Customize Your Own Figures
TANTIVE XI :: TANTIVE INVENTIVE - Creative with Star Wars :: Tantive Inventive :: Pictures and Image Tips
Page 1 of 1
Permissions in this forum:
You cannot reply to topics in this forum